Docs
PHP (Hypertext Preprocessor) is a widely-used open-source scripting language for web development, executing on the server-side to create dynamic web pages and web applications.
Website: https://www.php.net/
Type: SDK

This guide describes how to connect to our API, using our Riverty.com PHP SDK. It only covers the creation and submission of an order. Information and examples of other operations, like capture, cancel and refund, can be found in the package.
PHP currently offers these payment methods:
The available payment methods per country for PHP can be found in this table:
| Country | 14-day Invoice | Direct Debit | Campaign Invoice | Fixed Installments | B2B Invoice |
|---|---|---|---|---|---|
| The Netherlands | x | x | x | ||
| Belgium | x | ||||
| Germany | x | x | x | x | |
| Austria | x | x | x | ||
| Switzerland | x | ||||
| Sweden | x | x | x | x | |
| Norway | x | x | x | x | |
| Finland | x | x | x | x | |
| Denmark | x | x | x | x |
composer require payintegrator/afterpay
require 'vendor/autoload.php';
$riverty = new AfterpayAfterpay();
$riverty->setRest();
This object will be used to store the information of your order and to send an order to the Riverty API.
With the function $riverty->create_order_line you can send the specification of the order lines.
You can use this for any type of orderline, i.e.:
products shipping fee service fee discount
Note: prices are to be submitted in cents, including TAX.
Below is an example of an orderline for a product.
$sku = 'PRODUCT-001';
$name = 'Product name 1';
$qty = 3;
$grossUnitPrice = 2000; // in cents, including TAX (for discounts, use a negative number)
$vatAmount = 347; //in cents
$productUrl = "https://www.riverty.com/products/brown_wool_hat.jpg";
$imageUrl = "https://www.riverty.com/images/brown_wool_hat.jpg";
$riverty->create_order_line( $sku, $name, $qty, $grossUnitPrice, null, $vatAmount, null, null, $productUrl, $imageUrl );
In this step you set up the general order information and configure the Riverty object with this information. This contains the billing and shipping information and other relevant information like the ordernumber, the currency and the remote ip address of the customer.
Below is an example of a B2C order.
// Set up the bill to address
$order['billtoaddress']['city'] = 'Heerenveen';
$order['billtoaddress']['housenumber'] = '90';
$order['billtoaddress']['housenumberaddition'] = '5';
$order['billtoaddress']['isocountrycode'] = 'NL';
$order['billtoaddress']['postalcode'] = '8441ER';
$order['billtoaddress']['referenceperson']['dob'] = '1980-12-12T00:00:00';
$order['billtoaddress']['referenceperson']['email'] = 'tester@riverty.com;
$order['billtoaddress']['referenceperson']['initials'] = 'A';
$order['billtoaddress']['referenceperson']['isolanguage'] = 'NL';
$order['billtoaddress']['referenceperson']['lastname'] = 'de Tester';
$order['billtoaddress']['referenceperson']['phonenumber'] = '0513744112';
$order['billtoaddress']['streetname'] = 'KR Poststraat';

// Set up the ship to address
$order['shiptoaddress']['city'] = 'Heerenveen';
$order['shiptoaddress']['housenumber'] = '90';
$order['shiptoaddress']['housenumberaddition'] = '5';
$order['shiptoaddress']['isocountrycode'] = 'NL';
$order['shiptoaddress']['postalcode'] = '8441ER';
$order['shiptoaddress']['referenceperson']['dob'] = '1980-12-12T00:00:00';
$order['shiptoaddress']['referenceperson']['email'] = 'tester@riverty.com';
$order['shiptoaddress']['referenceperson']['initials'] = 'A';
$order['shiptoaddress']['referenceperson']['isolanguage'] = 'NL';
$order['shiptoaddress']['referenceperson']['lastname'] = 'de Tester';
$order['shiptoaddress']['referenceperson']['phonenumber'] = '0513744112';
$order['shiptoaddress']['streetname'] = 'KR Poststraat';

// Set up the additional information
$order['ordernumber'] = 'ORDER123';
$order['currency'] = 'EUR';
$order['ipaddress'] = $_SERVER['REMOTE_ADDR'];

// Create the order object for B2C or B2B
$riverty->set_order( $aporder, 'B2C' );
The result of the order will be set in the object $riverty->order_result. You can process the order, using the information in the object. Below is an overview of possible resultIDs in the object.
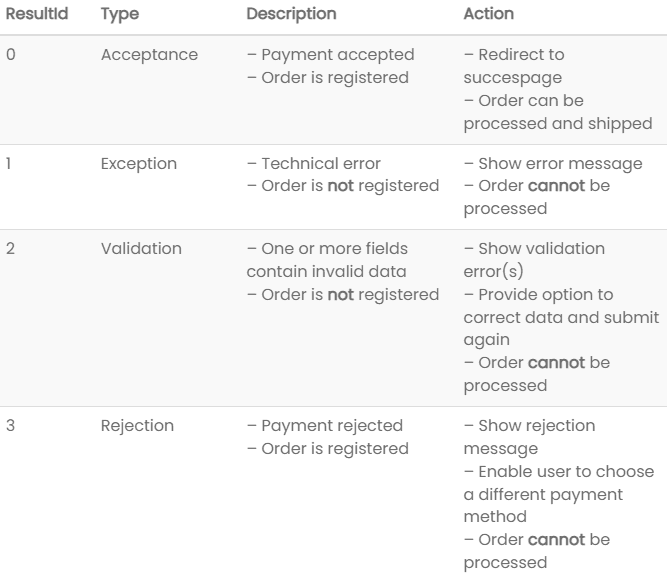
ResultId 0 – Accepted payment
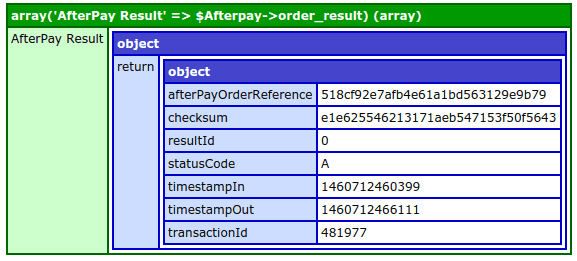
ResultId 1 – Technical error
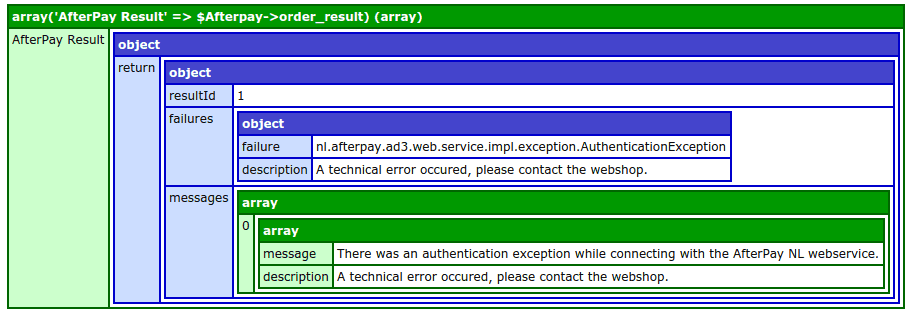
ResultId 2 – Validation error
ResultId 3 – Rejected payment
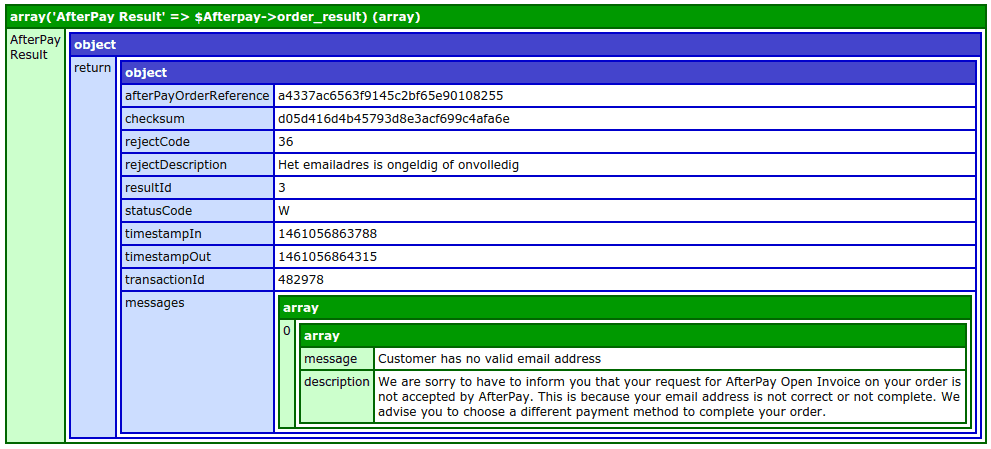
Each returnobject contains an array with 1 or more
messages: these are for logging and debugging descriptions: these are to be displayed in the webshop
foreach ($riverty->order_result->return->messages as $message)
{
    echo $message['message'];
}
Echo’s all the messages in the array.
foreach ($riverty->order_result->return->messages as $message)
{
    echo $message['description'];
}
Echo’s all the descriptions in the array.
ResultId 0 – accepted payment To check the submission of successful orders, place an testorder for each payment method with:
Below you will find the testdata that can be used.
ResultId 1 – technical error To verify and process a technical error, place a regular order, but trigger a technical error, for example using:
ResultId 2 – validation error To verify and process a validation error, place a regular order, but use invalid data, for example:
ResultId 3 – rejected payment To verify and process a rejected payment, place a regular order, but use the first name 'Reject' while communicating towards the sandbox environment.
In this chapter we will explain the Riverty visual guidelines you need to apply to your webshop.
For convenience and a familiar customer experience, please integrate/enclose the Riverty logo in your Checkout next to the payment method. Please refer to our Merchant Playbook for full details on how to make the customer experience smooth and frictionless.
When Implementing the Riverty logo throughout the shopping experience please ensure you are using our URL, not by downloading the image. The Riverty logos are hosted on a Content Delivery Network (CDN) to ensure the best performance and availability for your website. Furthermore, you do not have to care about changes, which are all done by Riverty.
We provide two types of logos through our CDN - .svg and .png. We recommend using the Riverty logo as a .svg file with regard to the quality and size of the file. If you prefer .png just change the end of the URL to .png.
| https://cdn.riverty.design/logo/riverty-checkout-logo.svg |
Riverty mandates that consumers be presented with Riverty's terms and conditions and Privacy Policy upon checkout. Thus the option to display the T&C should always be enabled in the plugin configuration. In certain cases where you would like to incorporate the Riverty T&C and Privacy Policy within your own Terms and Conditions, this must be done only with approval from Riverty's legal counsel. After approval include the country specific T&C and Privacy Policy resources.
In this chapter we will explain which steps you need to take to enable the payment method on production. For the final go-live a contract between you and Riverty is required.
Now that Riverty is live, we only have to check whether orders are also coming in properly. You can test this per Riverty connection by placing a rejected order:
STEP 1: Go to the webshop, and place a product in the shopping cart.
STEP 2: Go to checkout and fill in the necessary information, for the email address you have to enter rejection@riverty.com.
STEP 3: Choose the payment method Riverty and finish the order.
RESULT: The Riverty order should be rejected. If this is not the case and instead you receive a technical error or an authorization error please contact your Riverty Implementation Manager.
Be sure to sign up for a free Riverty Merchant Portal Account!
Initial sign-up will provide a test Merchant Portal account for you to explore, manage test transactions, and access test API keys. A full guide can be found in the portal's collapsed left menu. The live portal is provided once KYC and contract signing are complete.
Congratulations! You just went live with your Riverty connection. Please notify your Riverty Implementation Manager that you went live. If you encounter any issues in the upcoming week you can contact your Riverty Implementation Manager. After that period you can contact our local Merchant Desk for help.